
Clear, step-by-step instructions to get LTE working on your SynLink PDU for the first time.
Prerequisites
- 3FF (micro) SIM card — Registered & activated with a data plan.
- APN (Access Point Name) from your SIM provider (required).
- (Optional) Public / Static IP assigned to the SIM — if you want direct inbound access to the PDU. This usually costs extra from carriers.
- SynLink LTE PDU
- Antenna
- A laptop on the same LAN as the PDU for initial web UI configuration (or console access if required).
1. Hardware installation (safe physical steps)
-
Power off the PDU (remove mains power).
-
Open the SIM tray, insert the micro SIM until it clicks, and close the cover.
- Important: Never insert or remove a SIM while the PDU is powered — this can damage the modem or SIM.
-
Attach the antenna to the external antenna port. Tighten finger-tight — do not over-torque.
-
Power on the PDU.
2. Initial network access
You’ll configure LTE from the PDU web UI (recommended first-time flow). Make sure you can reach the PDU over Ethernet:
- Connect the PDU's Ethernet port to your local network or laptop switch.
- Allow the PDU obtain an IP via DHCP or set a Static IP using the front panel interface.
- Open a browser and go to the PDU IP address (e.g.,
https://192.168.1.100). - Log in with your admin credentials.
3. Configuring LTE via Web Interface
Navigate: Network → LTE
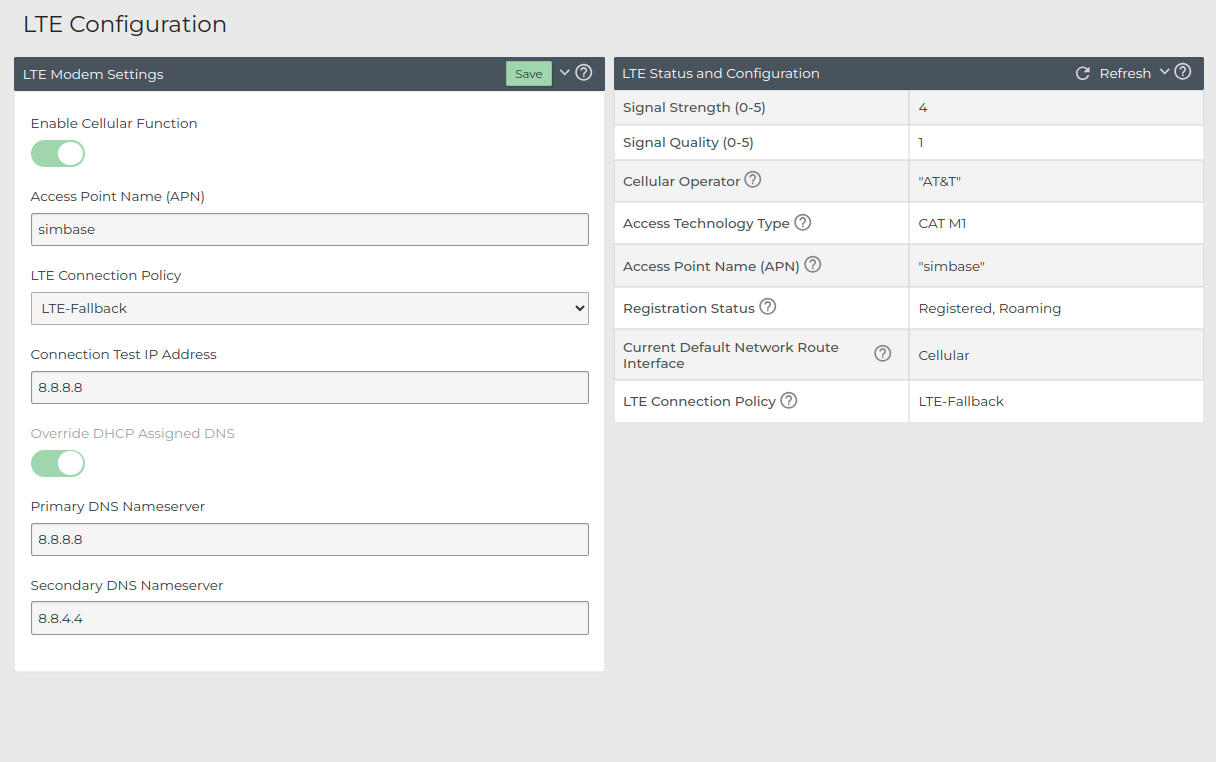
-
Enable Cellular Function (toggle switch).
-
Fill in required fields:
-
APN — from your SIM provider.
-
LTE Connection Policy — choose one:
LTE-Primary— prefer LTE; use Ethernet only if LTE fails.LTE-Fallback— prefer Ethernet; use LTE when Ethernet is down.
-
Connection Test IP Address — a stable IP to ping (default recommendation:
8.8.8.8). The PDU uses this to evaluate WAN health. -
Override DHCP Assigned DNS — enable if you want LTE DNS to supersede DHCP when LTE is active.
-
Primary / Secondary DNS — provide reliable DNS servers for when LTE is active (e.g.,
8.8.8.8,8.8.4.4).
-
-
Save the configuration.
-
On the LTE page, click Refresh / Status. Look for:
- Registration status:
Registered(good) - Signal Strength and Quality (ensure usable signal)
- Registration status:
-
If
Registered, you’re ready to use LTE. If not, see troubleshooting below.
4 Access & Management — Recommended: Synaccess Central Management Portal (CMP)
Summary: The recommended way to access and manage your LTE PDU is via Synaccess Central Management Portal (CMP). It’s simple, secure, and requires no special carrier setup, VPNs, or public IPs — just pair the device with your CMP account and manage it from the Management Portal.
Why Central Management Portal is recommended
- No router or carrier configuration required on site.
- Minimal on-site networking changes — works with typical site network setups.
- Centralized monitoring, alerts, and remote management (reboot, config, status) in one place.
Quick pairing & validation (field friendly)
- Configure LTE on the PDU (APN, LTE policy, DNS) as described in Section 3.
- Pair the PDU with your Synaccess CMP account: https://synaccess.readme.io/reference/connect-a-synlink-pdu
- In the CMP UI, confirm the PDU appears online.
- From an off-site device, verify you can view/manage the PDU in the CMP UI.
Short checklist
- PDU configured with correct APN and LTE policy.
- PDU paired to Synaccess CMP (pairing guide above).
- PDU visible and manageable in CMP UI.
- Alerts configured for connectivity and health.
Other access options (brief)
There are alternative ways to reach the PDU (for example: assigning a public IP to the SIM or using a carrier private network). These options require extra carrier involvement, may incur additional cost, and typically need coordination with Synaccess and your SIM provider — please reach out to [email protected] to discuss the details of these options.
4. Troubleshooting
Symptom — “LTE Status And Configuration” shows no information
Possible causes
- SIM card not registered / not activated by the carrier.
- SIM requires a network reset or re-provisioning by the carrier.
- APN missing or incorrectly entered.
- Antenna disconnected, loose, or placed where signal is blocked.
Step-by-step checks & fixes
-
Confirm the SIM is active with the carrier
- Verify the SIM has an active data plan and that carrier provisioning is complete. If the carrier requires activation steps (web portal, SMS, or support call), complete those first.
-
Power-cycle safely
- Power off the PDU, wait 5–10 seconds, then power back on. Re-check LTE status.
- Do not insert/remove SIM while the PDU is powered.
-
Reseat the SIM (power off first)
- Power off the PDU, open the SIM tray, confirm SIM is seated correctly (you should hear/feel a click), close tray, power on. If the SIM tray or card looks damaged, try a known-good SIM.
-
Check signal & antenna
- Verify the antenna is attached and finger-tight. Move the antenna to a less obstructed location if possible (higher, away from large metal surfaces). Low signal will prevent registration.
-
Collect basic diagnostics for support
- Take a screenshot or photo of the LTE Status page (include timestamps).
- Record: PDU model & firmware version, sim card, carrier and APN configured.
- Download the diagnostics log from the Web Interface under Logging->Diagnostics.
- Send diagnostics information to [email protected]
Quick cause → action mapping
- SIM not registered → Contact carrier to confirm activation; confirm APN; power-cycle PDU.
- SIM needs re-provisioning / network reset → Ask carrier to reset/re-provision the SIM; power-cycle PDU after carrier confirms.
- Antenna loose or mis-positioned → Power off, tighten antenna, reposition for better line-of-sight, power on and re-check.